Today we’ll ease into Palo Alto Threat Prevention with a post on URL Filtering. As the name suggests, URL Filtering allows you to shape and control web traffic as it traverses your firewall. If you missed it, we previously defined the objects, rules and polices required to create a basic perimeter firewall which you can find here: Palo Alto – Perimeter Firewall.
Threat Prevention
Palo Alto Networks offer a wide range of threat prevention solutions, so before we get start here’s some clarification on naming convention. Below are the licensable features currently available to Palo Alto firewalls that fall under the Threat Prevention:
- Threat Prevention – To create a bit of confusion the first threat prevention license offered by Palo Alto is called Threat Prevention. Under this license we have antivirus, anti-spyware and vulnerability protection. These features will be covered in a future post.
- URL Filtering – Specifically handles website access through the use of category based classifications. For URL Filtering you can purchase a subscription to BrightCloud’s URL filtering database that provides up-to-date categorization of web content. We’ll be taking a deep look into URL Filtering with a BrightCloud URL subscription.
- WildFire – This service allows an additional level of protection against infected attachments.
- Decryption Port Mirror – Taking full advantage of the Palo Alto’s layer 7 inspection you can create a mirror of unencrypted traffic to a desired port where it can then be captured and logged.
Before we get started on configuring URL Filtering, let’s quickly look at how the Palo Alto identifies web traffic through a process called App-ID.
App-ID
App-ID represents one of the greatest features separating Palo Alto firewalls from many of its competitors. Long gone are the days of being able to identify an application solely based on the port it uses. Instead we need insight into the higher levels of the OSI model to appropriately identify the traffic on a modern network. I covered this need in an earlier post on Deep Packet Inspection (DPI).
The Palo Alto uses four methods to identify traffic.
- Application Signatures – In a similar way to how malware and anti-virus software works, the Palo Alto will firstly compare traffic against a database of application signatures to determine the type of traffic.
- Decoding – Further refining the application signatures, decoders look deeper into a known application to tell us more information. For example, whether non-HTTP traffic is being tunneled across port 80, a common evasion technique.
- Heuristics – If the two methods above fail, there is a third method that attempts to narrow down the application based on traffic behavior such as packet length, session rate and packet source.
- SSL Decryption – If the traffic is encrypted, it can be decrypted before being analyzed. Decryption takes a bit of effort to setup due to certificate signing. Decryption is essentially a man-in-the-middle attack against the target traffic on your network and as such might also require some legal and/or managerial consent.
URL Filtering Profiles
Now that we know how web traffic is identified, we’ll turn our attention to shaping the traffic through the use of URL Filtering. Navigate to Objects > Security Profiles > URL Filtering
Here we’ll be presented with a list of existing URL Filter Security Profiles. At the moment there will only be a single entry called Default. Let’s click on Default to have a look at the structure of this filter.
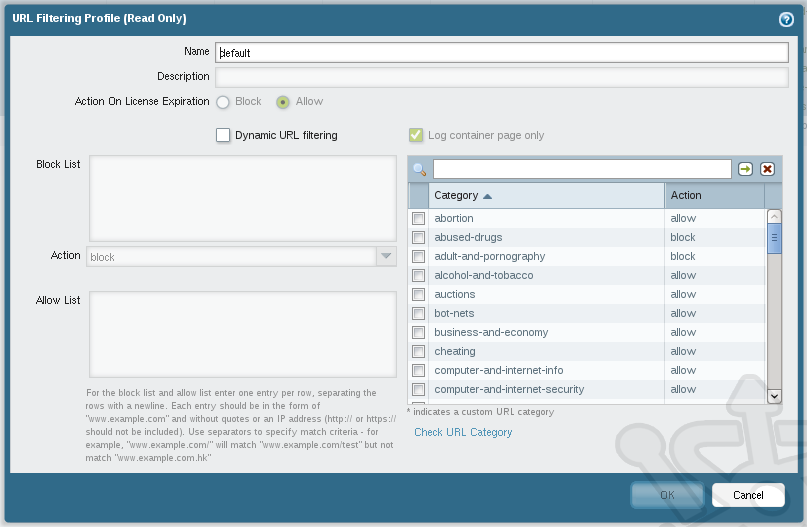
Here’s a quick tour of this dialog and the options available. Skipping the first two entries, Name and Description, which should be fairly self explanatory, the next item, Action On License Expiration is a fail-safe rule so that if your filtering license expires, you can specify how should traffic affected. Dynamic URL filtering enables direct access to the BrightCloud database for URL checks instead of relying on the device’s cached data. Log container page only allows for less verbose logging of URL traffic. Next we have our Block List and Allow List where you can specify specific URL to be explicitly permitted or denied. To the right we find the 80+ predefined URL categories which can then be allowed or blocked. Last but not least you’ll find a URL called Check URL Category which will send you to the BrightCloud URL Lookup page. On this page you can see if an existing URL resides in the database and if so, what category is belongs to.
Select the existing Default policy then click Clone at the bottom. Click on the new Default-1 profile to edit it.

Let’s now take a closer look at Categories which take a lot of the work out of managing web traffic.
Categories
URL Filtering works by checking the requested URL against a database of addresses to determine whether it falls into a permitted classification. We have a selection of categories to choose from which can be allowed or denied. The massive task of maintaining such an extensive database falls to a company by the name of BrightCloud. Its worth noting that to take advantage of BrightCloud URL Categorization service you will need to purchase the yearly service license. You can find more details of the BrightCloud service on their website.
Taking a look at our URL Filtering Profile dialog you will notice a list of categories along with an assigned action where your choices are as follows:
- Alert – Permit the traffic but notify us with an alert
- Allow – Permit the traffic
- Block – Deny the traffic and notify the user as such with a response page
- Continue – Notify the user that the site is blocked with a response page, but permit them to continue to the website if they choose
- Override – Used to create a password protected response page thereby protecting a category with a key
The BrightCloud service offers approximately 80 categories to leverage in classifying your traffic which you can find on the BrightCloud website.
Moving on we’ll customize the newly cloned URL profile. In the URL Filtering Profile dialog change the Name to corp.internet.url-filtering. Make a change to the default settings by first finding the item questionable in the category list. BrightCloud defines the questionable category as “Tasteless humor, ‘get rich quick’ sites, and sites that manipulate the browser user experience or client in some unusual, unexpected, or suspicious manner.” Since we like tasteless humor, click on block under the Action column and in the drop-down select alert. This will allow the traffic to flow, but still creates an entry for monitoring.

When complete click OK to save the new URL Filter profile.
Security Policy
Before we modify the security policy we need to discuss how security policies function on the Palo Alto; a glaring omission from the last post when we introduced this functionality. If you take away nothing else from this post, at least know:
- All traffic is denied until a policy is created to allow traffic to flow between zones.
- The policy list is processed starting from the top, so the order of policies is of utmost importance.
- Policies are processed by first match. The first policy to match the traffic is used.
- Following the first match, no subsequent rules are evaluated.
From this list we can develop some best practices for defining your policies:
- Keep most used rules at the top of the list
- Keep more specific rules higher than catch-all rules
With our URL Filter created we’ll now modify the existing Security Policy to use it. Navigate to Policies > Security. Click on the corp.internet policy we created in the last post.
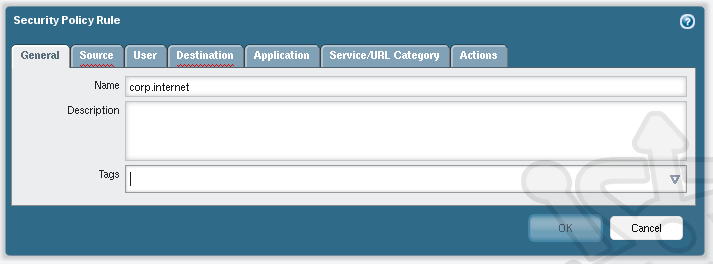
Open the Actions tab where we apply profiles.
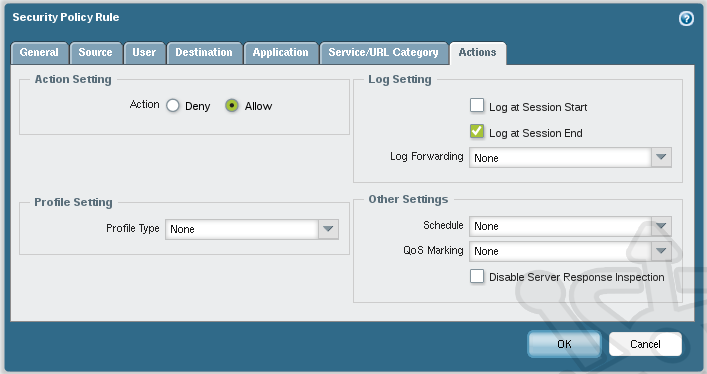
In the Profile Setting section, change the Profile Type drop-down to Profiles. For now we’ll leave all the values as None, except for URL Filtering which we’ll set to corp.internet.url-filtering.

That’s it! We now have a URL Filtering in place and enforcing our category selections. At this point you’re done, but if you read on you will find additional configurations that will bring more power to your filtering.
User-ID
Next up we can make URL Filtering more powerful by adding user identification. User-ID gives the ability to see who is behind the traffic beyond the usual IP addresses. While there are multiple methods of accomplishing this we’ll use Active Directory as our source for user identifiers. For this to work we’ll need three things in place:
- Enumeration – Collect users and their group memberships
- Mapping – Determine which users are assigned to which IP addresses
- Identification – Enable identification on the desired zone
We’re going to assume the environment is setup with two domain controllers which have LDAP enabled.
Enumeration
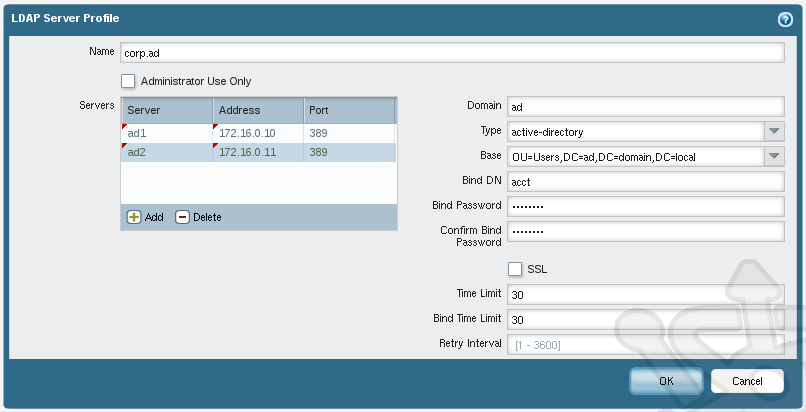
To get started with enumeration we need a list of groups and the users associated with them. Navigate to Device > Server Profiles > LDAP.
Create a new profile called corp.ad to which we’ll add both domain controllers. In the Servers list we add the addresses of the two domain controllers using the Port 389. In the Type field we select active-directory. The Base field will need to mirror your environment, but for this sample we’ll assume the basic AD structure and use OU=Users,DC=ad,DC=domain,DC=local. In the Bind DN and Bind Password fields we’ll enter the service account used for authenticating with the domain.
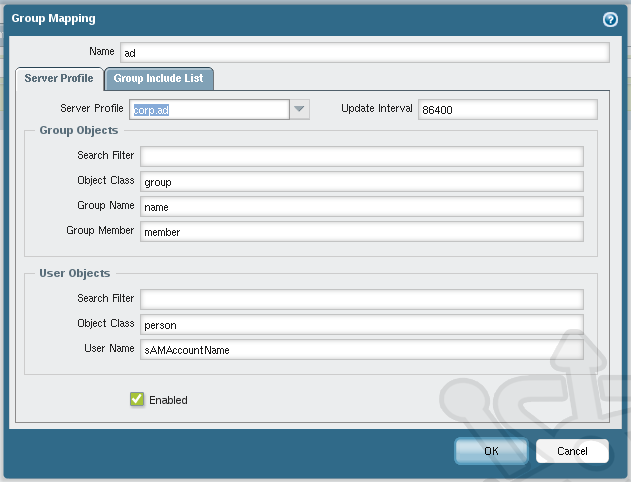
Next we navigate to Device > User Identification and select the Group Mapping Settings tab. Click on Add to create a new mapping.
In the Server profile drop-down we’ll select the profile corp.ad we just created. Then you need to specify the specifics of the users and groups we’re looking to include. Assuming that you don’t have any custom active directory fields we can use the default.
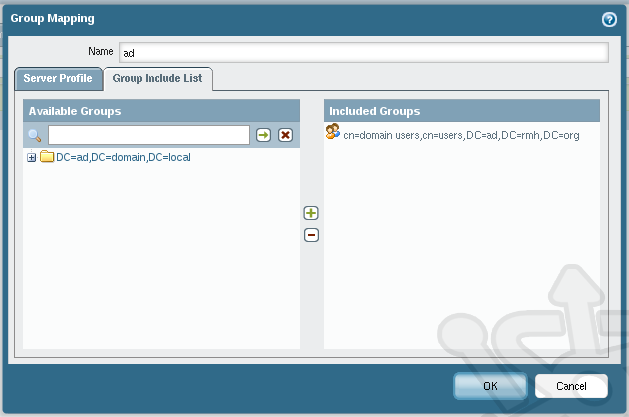
On the Group Includes List we see a list of the user and group objects found. As a catch-all let’s select Domain Users as our container group, meaning that all users that are members of Domain Users will be used for mapping.
Mapping
It used to be that the only way to perform IP Mapping was to install an agent on the servers you were monitoring. This changed with PAN-OS 5, where the device can now query security event logs directly without the addition of an installed User-ID agent. In our example we’ll add server monitoring to both AD servers as well as an Exchange server with what’s called the integrated User-ID agent. Integrated User-ID means all the work is done on the Palo Alto and that no agent is required on our servers. Now this is where the magic happens, when configured the Palo Alto will actively parse the event logs of the monitored servers allowing it to match IP addresses with domain user accounts.
Navigate to Device > User Identification and find the Server Monitoring section under the User Mapping tab.
In the Server Monitoring area click Add. In the new User Identification Monitoring Server dialog we’ll enter the details for our three servers ensuring to set the Type to Microsoft Active Directory and Microsoft Exchange where appropriate. After a few moments you should see each server show Connected under the Status header.

Enable Identification
The last piece of the User-ID puzzle is to enable identification. The first thing we’ll do is create a scope for the traffic we would like to identify. Navigate to Objects > Addresses.
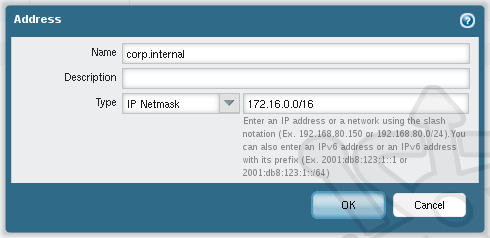
Click on Add and create a new entry for our internal network using the Name of corp.internal with a Type as IP Netmask and the slash notation 172.16.0.0/16.
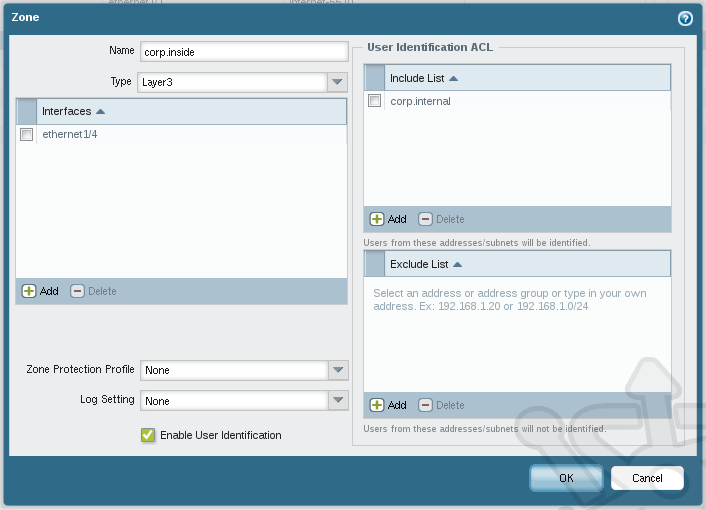
Next we navigate to Network > Zones. Open the zone we created in our last post called corp.inside. Inside the corp.inside zone we add the corp.internal address object to the User Identification ACL Include List. We then enable User-ID by selecting the Enable User Identification check box.
With these changes you should be able to navigate to Monitor > Logs > Traffic and see new traffic attributed to users under the Source User header. Obviously this will only identify users who are logged into the domain and likewise won’t deny traffic if the user is not logged in.
Custom URL Category
In our final scenario let’s assume that management has come to you with a website they don’t want staff to access. You could visit the BrightCloud website to determine what category the site falls under and block it entirely, but that’s a little heavy handed. Instead we can use a Custom URL Category and filter based on specific URLs.
Navigate to Objects > Custom URL Category. Click Add to create a new category. Specify the Name as corp.url-blocklist and in the Sites list add the address you would like to block.
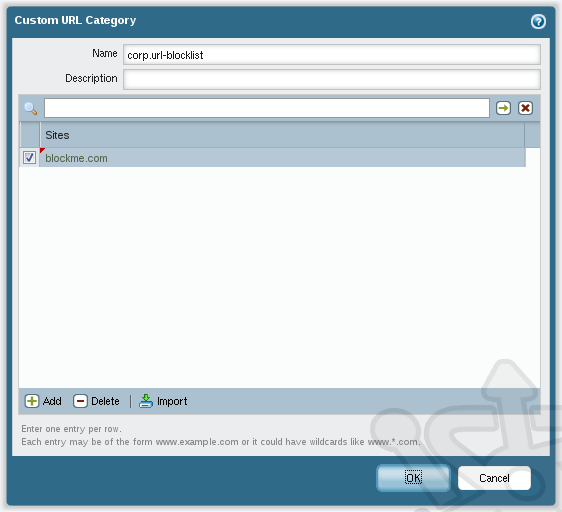
Next navigate back to Objects > Security Profiles > URL Filtering and once again open our corp.internet.url-filtering profile. In the list locate the corp.url-blocklist category and ensure the Action is set to block

Now if users attempt to access the site specified in the Custom URL Category, they will be presented with response page informing them that access been blocked.
As a footnote, you may notice the Block List and Allow List when editing your URL Filtering Profile. You could use these fields to block or allow URLs, but instead I’ve chosen to create a custom category for two reasons. Firstly, you can reuse a category later or with another profile without having copy and paste data unnecessarily. Secondly, having a custom category allows you to utilize it directly in a security policy under the Service/URL Category tab..
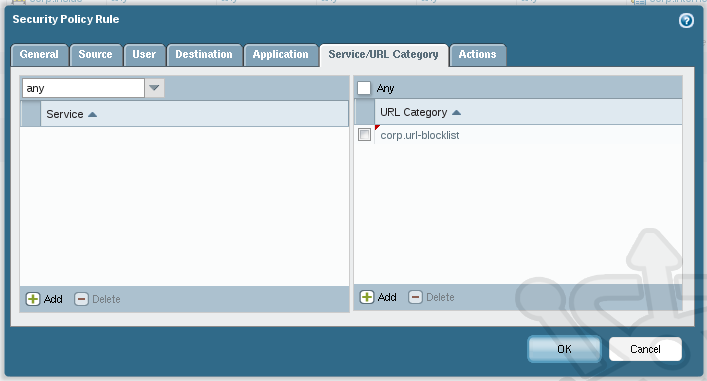
That concludes our tour through Palo Alto’s URL Filtering, as well some insight into the App-ID and User-ID features. While we didn’t touch on every part of URL Filtering this should be get you running with enough information for you to expand upon.
I am planning on implementing a Palo Alto solution in the near future. I understand that it comes with a default URL Filtering Profile configuration which blocks basic categories. I plan to create a customized URL Filtering Profile but am unsure which categories I should block and allow for my company. I am trying to find some examples of custom URL Filtering Profiles used by other companies which I could use as a reference for guidance. Do you have any examples of URL Filtering Profiles for a medium sized business? If not, do you know where I would be able to find some examples/template for guidance? If you do not know where I could find either of the previous 2 items… What Categories should a medium sized business be sure to block? Thanks