Creation of a DMZ allows you to place externally-facing services in an isolated security zone so that the internal network is not exposed to the outside world. Today we’ll take the textbook DMZ example one step further by sub-diving the DMZ into external and internal zones. Instead of a single firewall and DMZ switch we’ll need two of each. Doing so allows us to keep the outside and inside zones on completely different hardware adding to our overall security.
To help illustrate the configuration we’ll at a typical web server scenario. In this scenario we need external users to be able to access the web service, but without allowing them on the internal network. To make this a little more realistic our web server requires access to an internal SQL server.
To accomplish this task we’ll be relying on a few firewall commands, namely Network Address Translation (NAT) and Access Control Lists (ACL). Before we get started, let’s have a quick look at each of these commands. The examples in our configuration use IOS version 8.3+ syntax.
NAT
Thanks to Network Address Translation (NAT) everyone can use identical private address schemes and have still have internet connectivity. This is because NAT allows for the translation of a private IP into a publicly routable IP. In addition NAT can allow hosts outside the network to access the private IP space. Luckily this is relatively easy to configure as NAT statements are bidirectional.
Beginning with ISO version 8.3, Cisco has changed the way NAT is performed so let’s take a quick look at the new structure.
Manual NAT
Manual NAT (or Twice NAT) is done in the global configuration and can be based on source or destination. Manual NAT can be static or dynamic. This should be familiar to anyone who has worked with NAT.
Auto NAT
Introduced in IOS 8.3, Auto NAT are defined inside the object and like above an Auto NAT can be static or dynamic. The limitation of the new Auto NAT is that it cannot NAT by destination.
All the examples in the upcoming configuration will use Auto NAT.
After-auto NAT
Another new method, After-auto NAT, allows you to define a manual NAT after Auto NAT. This is useful if you want to define a Manual NAT, but only if no Auto NAT’s apply.
Priority
NAT rules are evaluated in the following priority:
- Manual NAT
- Auto NAT
- After-auto NAT
ACL
Access Control Lists (ACLs) are rules defining how the Cisco ASA permits or denys the flow of traffic in or out of an interface. When you define an interface, you configure the security level specifying the relative trust of the interface. When traffic attempts to go from a less secure to a more secure interface it is denied. Likewise, traffic going from a more secure to less secure interface is allowed by default. With the use of ACLs you can override these default security behaviors.
Topology

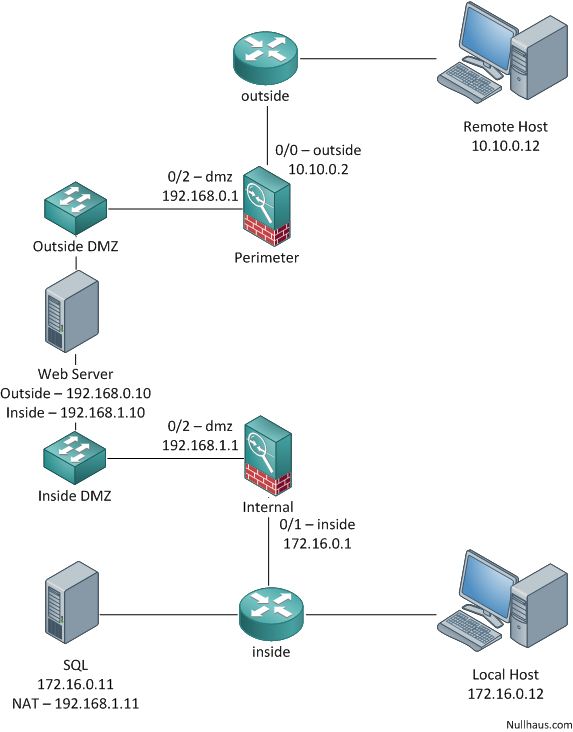
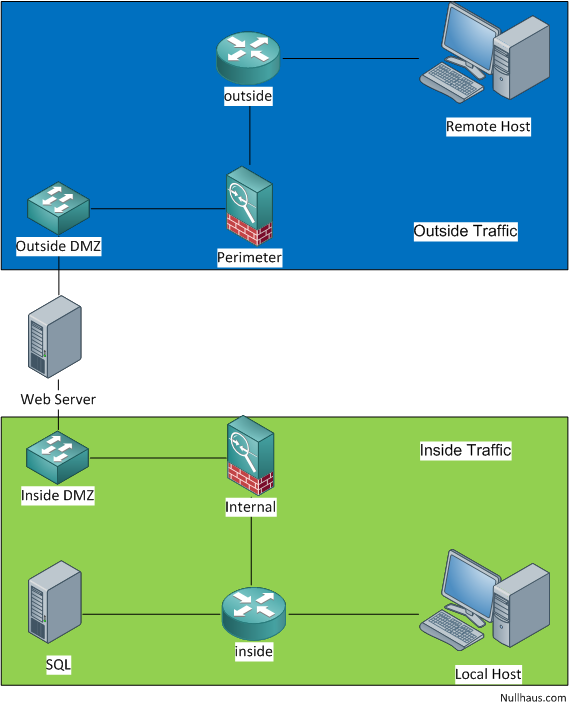
The network was designed to create three distinct zones: outside, dmz and inside. We’ll call these the secondary zones. The outside zone (or segregation) is represented by anything located off the perimeter firewall’s 0/0 port. The arrangement of the outside network is really not important. Our primary concern is that this network is outside our control and therefore we must protect against it. It’s the job of the Perimeter Firewall to ensure that only permitted traffic traverse between the outside and the DMZ. Behind the perimeter firewall, we have the DMZ. The DMZ zone is the home of our services that need external (or outside) access. The DMZ is further segregated into an inside and outside DMZ. Traffic from the outside is NAT’d through the perimeter firewall to the outside DMZ to reach the servers behind. Its important to note that this ends the involvement of the perimeter firewall and outside DMZ. They are only involved in traffic concerning outside traffic. When our DMZ server needs to reach the internal network, it traverses the inside DMZ and hits another firewall. The Inside Firewall allows traffic to flow from the DMZ servers to reach internal resources and vise versa. Now if all this makes sense, I’ll let you know that our three secondary security zones: outside, dmz and inside are housed in two larger primary zones. We’ll call these primary zones outside traffic and inside traffic. As you may have gleaned, the Outside traffic zone only deals with outside traffic and likewise the Inside traffic zone only deals with traffic from the inside. The key is that there is no connection between the perimeter and inside firewall and the communication between the outside and inside traffic zones never overlap.

Outside traffic zone
- Outside
- Outside (Perimeter) Firewall
- Outside DMZ
Inside traffic zone
- Inside DMZ
- Inside (Internal) Firewall
- Inside
While creating greater security for a network with external facing services, it comes at the cost of being able to talk to the outside network from the inside.
Perimeter Firewall
The perimeter firewall is what most people think of when they hear the word firewall. It faces the hostile outside world, blocking unwanted traffic from reaching inside our network. In our scenario the perimeter firewall’s sole purpose is to provide outside connectivity to hosts in the DMZ, or more specifically interfaces in the outside DMZ.
Interfaces
Before we start, a quick note on the addressing used in this example. To help clearly demonstrate the division between the three secondary zones (outside, inside and dmz) I’ve chosen to use the Private IPv4 address spaces. I’ve used 10.10.0.0/24 to represent the outside, 172.16.0.0/24 for the inside and 192.168.0.0/24 is the DMZ.
The key pieces of information we need to specify for the interfaces are: nameif, security-level and ip address. Using the topology above, we configure GigabitEthernet0 as the outside interface. By naming this interface outside, security level will be set to 0 automatically, indicating that it is the least trusted interface. Being that it is the least trusted, any inbound traffic will require an ACL to be permitted to traverse to another interface. Lastly we create an address for the interface. As per the diagram we’ll give the outside interface an address of 10.10.0.2.
interface GigabitEthernet0
 nameif outside
 security-level 0
 ip address 10.10.0.2 255.255.255.0
Next we create the DMZ interface. We’ll set the security-level to 50 specifying that it is a more secure interface than the outside. We’ll also set the IP address to 192.168.0.1. Note that I’ve decided to use GigabitEthernet2 for the DMZ in hopes that it makes the design easier to understand as per the diagram.
interface GigabitEthernet2
 nameif dmz
 security-level 50
 ip address 192.168.0.1 255.255.255.0
While we’re configuring the interfaces let’s also specify our default route to use the outside interface.
route outside 0.0.0.0 0.0.0.0 10.10.0.1 1
Objects
Next we create objects to describe our network. The first is the IP address of the web server on the DMZ and second is the address we want our web server to be NAT’d. The last is a reference the DMZ subnet as a whole.
object network dmz_webserver
 host 192.168.0.10

object network outside_webserver
 host 10.10.0.10

object network dmz_subnet
subnet 192.168.0.0 255.255.255.0
NAT
Using the two web server objects we create a NAT from the DMZ to the outside interface.
object network dmz_webserver
 nat (dmz,outside) static outside_webserver service tcp www www
Next we’ll include a catch-all NAT which allows any hosts inside the DMZ to reach outside. This is not required for our configuration, but gives your DMZ hosts a means to access the outside world. As with any additional access, this does open a potential security hole.
object network dmz_subnet
 nat (dmz,outside) dynamic interface
ACLs
While our NAT creates the link between the web server’s DMZ address and an address on the outside interface, no traffic can flow until we have an ACL in place. We’ll create an ACL that allows any outside host to speak to the web server’s NAT’d address on port 80. Secondly we’ll allow any host on the DMZ to go through the DMZ interface.
access-list outside_acl extended permit tcp any object dmz_webserver eq www
access-list dmz_acl extended permit ip any any
Lastly we need to assign our newly created ACLs to their proper interfaces. Remember that you always want to apply an ACL on traffic travelling into an interface.
access-group outside_acl in interface outside
access-group dmz_acl in interface dmz
Verification
With these changes in place, let’s look at a few of the scenarios involving our new rules.
Outside into web server
Let’s verify that an outside host can reach our web server on the web service port.
ciscoasa(config)# packet-tracer input outside tcp 8.8.8.8 12345 10.10.0.10 80

Phase: 1
Type: UN-NAT
Subtype: static
Result: ALLOW
Config:
object network dmz_webserver
 nat (dmz,outside) static outside_webserver service tcp www www
Additional Information:
NAT divert to egress interface dmz
Untranslate 10.10.0.10/80 to 192.168.0.10/80

Phase: 2
Type: ACCESS-LIST
Subtype: log
Result: ALLOW
Config:
access-group outside_acl in interface outside
access-list outside_acl extended permit tcp any object dmz_webserver eq www
Additional Information:

Phase: 3
Type: IP-OPTIONS
Subtype:
Result: ALLOW
Config:
Additional Information:

Phase: 4
Type: NAT
Subtype: rpf-check
Result: ALLOW
Config:
object network dmz_webserver
 nat (dmz,outside) static outside_webserver service tcp www www
Additional Information:

Phase: 5
Type: IP-OPTIONS
Subtype:
Result: ALLOW
Config:
Additional Information:

Phase: 6
Type: FLOW-CREATION
Subtype:
Result: ALLOW
Config:
Additional Information:
New flow created with id 2, packet dispatched to next module

Result:
input-interface: outside
input-status: up
input-line-status: up
output-interface: dmz
output-status: up
output-line-status: up
Action: allow
Outside to web server on alternate ports
Verify that outside hosts cannot access ports other than 80 on our web server.
ciscoasa(config)# packet-tracer input outside tcp 8.8.8.8 12345 10.10.0.10 25

Phase: 1
Type: ROUTE-LOOKUP
Subtype: input
Result: ALLOW
Config:
Additional Information:
in   10.10.0.0       255.255.255.0   outside

Phase: 2
Type: ACCESS-LIST
Subtype:
Result: DROP
Config:
Implicit Rule
Additional Information:

Result:
input-interface: outside
input-status: up
input-line-status: up
output-interface: outside
output-status: up
output-line-status: up
Action: drop
Drop-reason: (acl-drop) Flow is denied by configured rule
Outside to other DMZ hosts
Verification that the outside cannot reach other devices inside our DMZ.
ciscoasa(config)# packet-tracer input outside tcp 8.8.8.8 12345 10.10.0.11 80

Phase: 1
Type: ROUTE-LOOKUP
Subtype: input
Result: ALLOW
Config:
Additional Information:
in   10.10.0.0       255.255.255.0   outside

Phase: 2
Type: ACCESS-LIST
Subtype:
Result: DROP
Config:
Implicit Rule
Additional Information:

Result:
input-interface: outside
input-status: up
input-line-status: up
output-interface: outside
output-status: up
output-line-status: up
Action: drop
Drop-reason: (acl-drop) Flow is denied by configured rule
Any DMZ host to outside
Lastly we can demonstrate that any host inside the DMZ can reach the outside.
ciscoasa(config)# packet-tracer input dmz tcp 192.168.0.11 12345 8.8.8.8 12345

Phase: 1
Type: ROUTE-LOOKUP
Subtype: input
Result: ALLOW
Config:
Additional Information:
in   0.0.0.0         0.0.0.0         outside

Phase: 2
Type: ACCESS-LIST
Subtype: log
Result: ALLOW
Config:
access-group dmz_acl in interface dmz
access-list dmz_acl extended permit ip any any
Additional Information:

Phase: 3
Type: IP-OPTIONS
Subtype:
Result: ALLOW
Config:
Additional Information:

Phase: 4
Type: NAT
Subtype:
Result: ALLOW
Config:
object network dmz_subnet
 nat (dmz,outside) dynamic interface
Additional Information:
Dynamic translate 192.168.0.11/12345 to 10.10.0.2/23975

Phase: 5
Type: IP-OPTIONS
Subtype:
Result: ALLOW
Config:
Additional Information:

Phase: 6
Type: FLOW-CREATION
Subtype:
Result: ALLOW
Config:
Additional Information:
New flow created with id 3, packet dispatched to next module

Result:
input-interface: dmz
input-status: up
input-line-status: up
output-interface: outside
output-status: up
output-line-status: up
Action: allow
Internal Firewall
The second firewall controls communication within the inside security zone. As the perimeter firewall protects against the outside world, the internal firewall protects against hosts in the DMZ. While these may seem very different, the mindset should be the same. The purpose of a firewall is to allow only permitted traffic and to that end you should vet traffic between the inside DMZ and the inside network as rigorously as you do traffic on the perimeter firewall.
Interfaces
To provide connectivity between the inside DMZ and inside subnet we need to create interfaces on both networks.
interface GigabitEthernet1
 nameif inside
 security-level 100
 ip address 172.16.0.1 255.255.255.0

interface GigabitEthernet2
 nameif dmz
 security-level 50
 ip address 192.168.1.1 255.255.255.0
Objects
When creating objects for our internal firewall we need to account for our web server as well as the SQL server. Additionally we’ll create an object for our inside subnet.
object network dmz_webserver
 host 192.168.1.10

object network dmz_sqlserver
 host 192.168.1.11

object network sqlserver
 host 172.16.0.11

object network inside_subnet
 subnet 172.16.0.0 255.255.255.0
NAT
Using our objects we’ll create a NAT for our SQL server on the DMZ. This allows us to easily created rules allowing the web server to initiate communication with our SQL server.
object network sqlserver
 nat (inside,dmz) static dmz_sqlserver service tcp sqlnet sqlnet
ACLs
With the NAT created, we make an ACL to allow the traffic. We’ll also deny any other traffic to the inside from the DMZ. Once again we need to apply the newly created ACLs to the interface.
access-list dmz_acl extended permit tcp object dmz_webserver object sqlserver eq sqlnet
access-list dmz_acl extended deny ip any object inside_subnet

access-group dmz_acl in interface dmz
Verification
Let’s ensure the newly created rules work as expected.
Web server to SQL server
Web server can access the internal SQL server through the SQL’s service port.
ciscoasa# packet-tracer input dmz tcp 192.168.1.10 12345 192.168.1.11 sqlnet

Phase: 1
Type: ACCESS-LIST
Subtype:
Result: ALLOW
Config:
Implicit Rule
Additional Information:
MAC Access list

Phase: 2
Type: UN-NAT
Subtype: static
Result: ALLOW
Config:
object network sqlserver
 nat (inside,dmz) static dmz_sqlserver service tcp sqlnet sqlnet
Additional Information:
NAT divert to egress interface inside
Untranslate 192.168.1.11/1521 to 172.16.0.11/1521

Phase: 3
Type: ACCESS-LIST
Subtype: log
Result: ALLOW
Config:
access-group dmz_acl in interface dmz
access-list dmz_acl extended permit tcp object dmz_webserver object sqlserver eq sqlnet
Additional Information:

Phase: 4
Type: IP-OPTIONS
Subtype:
Result: ALLOW
Config:
Additional Information:

Phase: 5
Type: NAT
Subtype: rpf-check
Result: ALLOW
Config:
object network sqlserver
 nat (inside,dmz) static dmz_sqlserver service tcp sqlnet sqlnet
Additional Information:

Phase: 6
Type: IP-OPTIONS
Subtype:
Result: ALLOW
Config:
Additional Information:

Phase: 7
Type: FLOW-CREATION
Subtype:
Result: ALLOW
Config:
Additional Information:
New flow created with id 3, packet dispatched to next module

Result:
input-interface: dmz
input-status: up
input-line-status: up
output-interface: inside
output-status: up
output-line-status: up
Action: allow
Web server to SQL server other port
Web server cannot cannot access any other port on the SQL server.
ciscoasa# packet-tracer input dmz tcp 192.168.1.10 12345 192.168.1.11 12345

Phase: 1
Type: ROUTE-LOOKUP
Subtype: input
Result: ALLOW
Config:
Additional Information:
in   192.168.1.0     255.255.255.0   dmz

Phase: 2
Type: ACCESS-LIST
Subtype:
Result: DROP
Config:
Implicit Rule
Additional Information:

Result:
input-interface: dmz
input-status: up
input-line-status: up
output-interface: dmz
output-status: up
output-line-status: up
Action: drop
Drop-reason: (acl-drop) Flow is denied by configured rule
Web server to any inside
Ensure that the web server cannot reach any other hosts on the inside subnet.
ciscoasa(config)# packet-tracer input dmz tcp 192.168.1.10 12345 172.16.0.11 12345

Phase: 1
Type: ROUTE-LOOKUP
Subtype: input
Result: ALLOW
Config:
Additional Information:
in   172.16.0.0      255.255.255.0   inside

Phase: 2
Type: ACCESS-LIST
Subtype: log
Result: DROP
Config:
access-group dmz_acl in interface dmz
access-list dmz_acl extended deny ip any object inside_subnet
Additional Information:

Result:
input-interface: dmz
input-status: up
input-line-status: up
output-interface: inside
output-status: up
output-line-status: up
Action: drop
Drop-reason: (acl-drop) Flow is denied by configured rule
Management
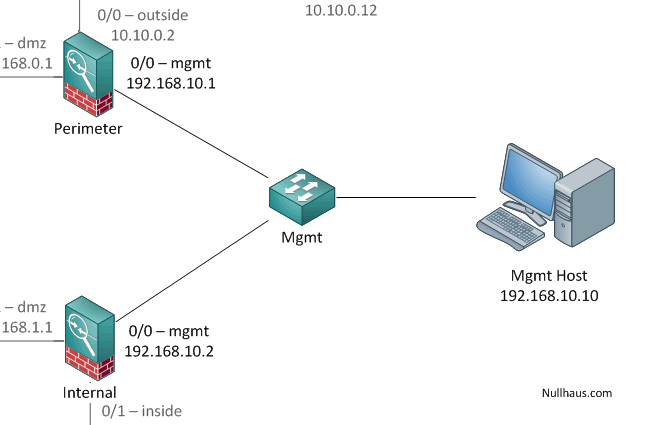
A problem we create with the two primary security zones is the barrier for management. The last thing we want to do is nullify our work by tying the firewalls directly to the internal network. The cleanest solution is to create a separate management network which feeds an isolated management host.

Keep in mind that while this isolates our management from the internal network, we’re still creating a link between two firewalls. Taking this design to the logical conclusion we would isolate each of the management interfaces to its own network and further protected them behind a management network firewall. As always you need to find a balance between usability and security.
Great work, thank you very much
Awesome work, it helped me a lot in order to understand all the concepts involved.